Session 1 – Getting started with Illustrator
First two hours: navigate the interface and create basic vector shapes confidently
Introduction and the Illustrator workspace
10:00 – 10:20 Create a new ‘print’ document and set up artboard size and CMYK colour for printing
(RGB is used only for screen display on Websites and videos).
The interface: Menu bar, Toolbox, Control bar, Artboard, Panels (Layers, Properties, Swatches).
Differences between Photoshop bitmap images and Illustrator vector paths:
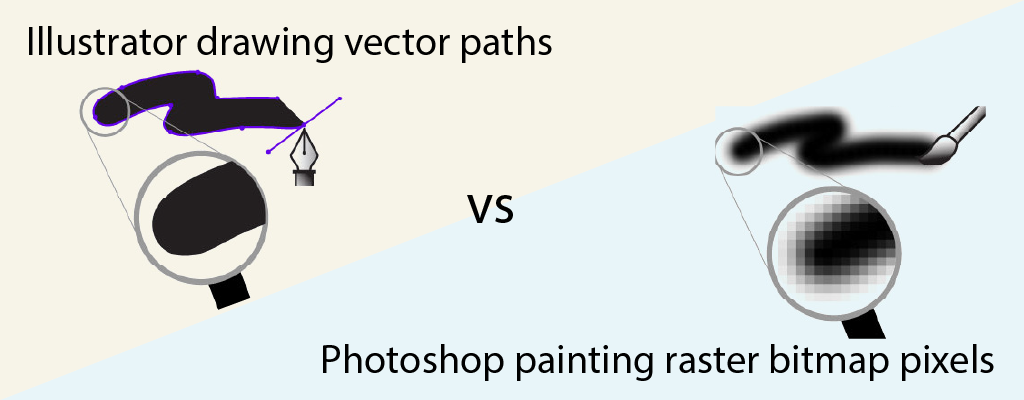
image composited from vector-conversions.com
It is possible to ‘rasterize’ a vector image in Illustrator (Object > Rasterize…) to make it a pixel bitmap, and the RIP (Raster Image Processor) in many printers does exactly that with the printed image, while using the vector path for the cutter.
10:20 – 10:25 ☕ Break
Basic shapes and the Selection tools
10:25 – 10:45 Guided practice Rectangle, Ellipse, Polygon, and Star tools. Drawing with constraints (Shift key). Selection Tool vs Direct Selection Tool — moving, resizing, and selecting anchor points. Introduction to the Pen tool — the core tool in Illustrator. Click to place anchor points; click-drag to create curves (Bézier handles); drag handles to change shape of curve.
10:45 – 10:50 ☕ Break
Fill, stroke and colour
10:50 – 11:10 Demo Guided practice Fill vs stroke. Colour Picker, Swatches panel, and hex values. Stroke weight and style (dashed, round cap). Introduce the Eyedropper tool for sampling colours.
11:10 – 11:15 ☕ Break
Layers and object organisation
11:15 – 11:35 Layers panel: creating, renaming, locking, hiding, and reordering layers. Grouping objects (Cmd/Ctrl+G). Stacking order: Bring Forward / Send Backward works only within the layer group. Reorganise the artwork into a logical layer structure (background shapes, foreground text).
Type Tool: point type (click to create just a single line of type) vs area type (text box). Character and Paragraph panels — font, size, leading, tracking, alignment. Create Outlines to turn font letterforms into editable paths which the cutter can use.
11:35 – 11:40 ☕ Break
Transformations & alignment
11:40 – 12:00 Scale, Rotate, Reflect, and Shear. Double-click the tool to open the Transform panel for precise values.
Questions on anything from the session.
Session 2 – Drawing, text & working files
Second two hours: Draw custom paths, add and style text, and export finished artwork in the correct format for printing.
Recap & the Pen tool
10:00 – 10:20 Recap of Session 1
Key shortcuts: P (Pen), A (Direct Selection), C (Anchor Point).
10:20 – 10:25 ☕ Break
Pen tool practice & path editing
10:25 – 10:45 Traces a simple shape (e.g. a leaf outline) using the Pen tool. Editing paths after drawing: adding/removing anchor points, converting between smooth and corner points with the Anchor Point tool, adjusting Bézier handles.
10:45 – 10:50 ☕ Break
Working with type
10:50 – 11:10 Placing text on a path. Add a title and a body-copy block to artwork, styled to match.
Align panel: aligning and distributing objects.
11:10 – 11:15 ☕ Break
Pathfinder & Boolean operations
11:15 – 11:35 Demo Exercise Pathfinder panel: Unite, Minus Front, Intersect, Exclude. Compound paths. Practical exercise: build a complex shape (e.g. a simple icon or logo mark) using only Pathfinder operations on basic shapes. Trainer demonstrates first, then trainee attempts the same design independently.
11:35 – 11:40 ☕ Break
Saving, exporting & next steps
11:40 – 12:00 File formats explained: .ai (native), .pdf, .svg, .eps. (Export for Screens vs Save for Web if time allows).
Keyboard shortcut cheat sheet handout. Recommended practice exercises to do independently.
Open Q&A — any remaining questions and what to learn next (gradients, effects, Image Trace?)
—
Roland VersaWorks 7 manual
Notes from Dave:
name jobs in the style of
jobNo_client_jobtype_SO(supplyOnly)-2pc-LAYUP_v1.0
LAYUP could be PRINT
Path > Offset Path 10pt or so to create bleed around the cut path when cutting shapes
Convert text to outlines, merge paths with overlap image
Reduce artboard canvas size to just around the graphics save wastage at print stage
Then save as > client AW folder > then either create or use 3 folders :
- Proof
- Supplied
Place onto proofing template file in 00 PMX Coatings, then save as or Export to add that PDF to the customer’s Proof folder.
Use password to restrict editing security and permissions
Save as PDF
CMYK, add trim marks if oversized with bleed and will need hand cutting to size
Colour conversion – Dave did not do this, which surprised me. There may be a profile supplied with the printer that might improve colour fidelity for new customers (existing ones should probably be left as is to maintain consistency)
Job by job – make sure images are sufficiently hi res
Spot colours – New group 1 > Artwork 3 – is a duplicate of CutContour
Artwork 2 (grey) is actually to print white
There is a file ROLAND SPOT COLOURS in 00 PMX Coatings
1600mm wide – wall graphics in house
Wall graphics wall drops 10mm all round
50mm bleed on main file
Ford_0360_25pc_vehicleOutline
New layer Van Colour underneath and flood with actual colour
Outlines copied and pasted in
Compound paths and layer masks